Tuesday, December 30, 2008

Warhammer Online Builds: White Lion Template


This was rather a difficult choice for a template. You can choose to strengthen yourself, your pet, or both. I would normally select “myself”, however after quite a bit of debate I went with choosing “both” which is the path of “The Hunter”. This choice was made for no other reason then for the end game PvP viability of the build. Top three stats:

  • Strength = Increased melee damage
  • Wounds = Increased hit points
  • Toughness = Lowers incoming damage.

The 25 points will be placed as follows: (There will be a few extra points due to RvR rewards, however we will not use them here)

15 in “The Hunter”
Buy all skills in “The Hunter” tree for one point each. I know this is very unusual as I do not like getting all the skills in a single tree line, however for this build I will make an exception.

The last 4 points will be put in “The Guardian” tree. Any additional points should also be placed in “The Guardian”, there is no reason to buy the bottom skill in the tree.

80 RvR points to be placed in:

  • Might level 1 = 1 point
  • Might level 2 = 3 points
  • Might level 3 = 6 points
  • Might level 4 = 10 points
  • Might level 5 = 14 points
  • Fortitude level 1 = 1 point
  • Fortitude level 2 = 3 points
  • Assault level 1 = 2 points
  • Assault level 2 = 4 points
  • Assault level 3 = 6 points
  • Opportunist level 1 = 5 points
  • Opportunist level 2 = 10 points
  • Opportunist level 3 = 15 points

The purpose of this build is to be able to do your own thing with minimal management of your pet. While you will still need to keep an eye on him and manage him to an extent, you will not have to micromanage him. You will be able to kill caster easy and with “Pounce”, they will never know where you came from. This build will give you more then enough DPS and enough survival to rip up either the front or back of the enemies line of combat.

Here are the planned active morale skills:

  • Level 1 = Sever Nerve
  • Level 2 = Flying Axe
  • Level 3 = Dominance
  • Level 4 = Blade and Claw

Slotted Tactics can be changed “on the fly”, as long as you are not in combat. Since there are 5 quick slots available, I would use each one in a different situation. One for PvP fight, one for PvE Group, and one for PvE solo. Here is my choice for a “PvP fight”:

  • Brute Force
  • Pack Hunting
  • Lion Heart
  • Hack and Slash

Build Strength:
All around decent DPS and survival skills.

Build Weakness:

Since this is a well rounded build there really are not any weaknesses.

Warhammer Online Build: Engineer Template


This build should get you up and running as a “medium” range specialist. This means that you will have to remain a little more mobile then a long range specialist, as you will always need to be “on the move“.

  • Ballistic Skill = Increased ranged damage.
  • Wounds = Increased hit points
  • Toughness = Lowers incoming damage.

The 25 points will be placed as follows: (There will be a few extra points due to RvR rewards, however we will not use them here)

15 in “The Grenadier” The following skills should be purchased for one point each:

  • Sticky Bomb
  • Throwing Arm
  • Strafing Run
  • Bandolier
  • Napalm grenade
  • Artillery Barrage

The following skill should not be purchased: “Extra Powder” The last 4 points will be put in the “Tinkerer” tree. Any additional points should also be placed in the Tinkerer tree, there is no reason to buy the bottom skill in the tree.

80 RvR points to be placed in:

  • Marksmen level 1 = 1 point
  • Marksmen level 2 = 3 points
  • Marksmen level 3 = 6 points
  • Marksmen level 4 = 10 points
  • Marksmen level 5 = 14 points
  • Fortitude level 1 = 1 point
  • Fortitude level 2 = 3 points
  • Sharp Shooter level 1 = 2 points
  • Sharp Shooter level 2 = 4 points
  • Sharp Shooter level 3 = 6 points
  • Sure Shot level 1 = 5 points
  • Sure Shot level 2 = 10 points
  • Sure Shot level 3 = 15 points

As far as AP, range, and DPS go, this should be your best build. As mentioned you have to be mobile with this build, however that should not be a problems.

Here are the planned active morale skills:

  • Level 1 = Point - Blank
  • Level 2 = Unshakable Focus
  • Level 3 = Cannon Smash
  • Level 4 = Artillery Barrage

Slotted Tactics can be changed “on the fly”, as long as you are not in combat. Since there are 5 quick slots available, I would use each one in a different situation. One for PvP fight, one for PvE Group, and one for PvE solo. Here is my choice for a “PvP fight”:

  • Steady Aim
  • Throwing Arm
  • Tangling Wire
  • Bandolier

Build Strength:

Great medium range AOE damage, with some added CC.

Build Weakness:

Cannot sit still in one place to long on a mobile battlefield

Monday, December 29, 2008

Warhammer Online Build: Ironbreaker template


I have to admit I am really upset with this class. I put a lot of time and effort into researching a class before I go and attempt a template, and in this case, it was a waste of time. Not only is the
choice so obvious, it is also very much OP compared to the other classes. This is not only due to the fact of the classes abilities and strengths, however the same tree is both extremely viable for PvP AND PvE, a simple slotted tactic change is all that is needed to switch between the two. The three stats:

  • Strength = Increased melee damage
  • Wounds = Increased hit points
  • Toughness = Lowers incoming damage.

The 25 points will be placed as follows: (There will be a few extra points due to RvR rewards, however we will not use them here)

15 in “Vengeance”
Buy all the skills in the “Vengeance” tree for one point each. This is really a “no brainer” here.

The last 4 points will be put in the “Brotherhood” tree. Any additional points should also be placed in “The Guardian”, there is no reason to buy the bottom skill in the tree.

80 RvR points to be placed in:

  • Might level 1 = 1 point
  • Might level 2 = 3 points
  • Might level 3 = 6 points
  • Might level 4 = 10 points
  • Might level 5 = 14 points
  • Fortitude level 1 = 1 point
  • Fortitude level 2 = 3 points
  • Assault level 1 = 2 points
  • Assault level 2 = 4 points
  • Assault level 3 = 6 points
  • Opportunist level 1 = 5 points
  • Opportunist level 2 = 10 points
  • Opportunist level 3 = 15 points

Let’s face it, this is War in “easy mode”. Build up your “Grudge” to max and use the skills in the “Vengeance” tree as you desire. Going from empty to full Grudge in a PvP scenario should take you about 10-15 seconds. The only two skills that you should use, that actually spends Grudge is “Ancestor’s Fury”,(As a temp buff) and “Away With Ye”.(For the knock back) The Destruction version of this class is the Blackguard, I greatly encourage you to look at that classes skills and skills in the class trees. You will not only see a great imbalance, but also that this class needs nerfed pretty bad.

Here are the planned active morale skills:

  • Level 1 = Rock Clutch
  • Level 2 = Raze
  • Level 3 = Gromril Plating
  • Level 4 = Strength in Numbers

Slotted Tactics can be changed “on the fly”, as long as you are not in combat. Since there are 5 quick slots available, I would use each one in a different situation. One for PvP fight, one for PvE Group, and one for PvE solo. Here is my choice for a “PvP fight”:

  • Sweet Revenge
  • Overprotective
  • Great Axe Mastery
  • Powered Etchings

Build Strength:

Overpowered DPS and abilities for a tank. To switch into PvE mode all you need to do is switch your tactics out.

Build Weakness:

While this build is OP for PvP, and you can switch into PvE mode with the change of tactics, you will not be the best of the PvE builds. While My focus is on PvP, just thought I would give this little warning: You cannot “main tank” in end game PvE with this build.

Warhammer Online Build: Archmage Template


This will be a PvP virgin healer build for the Archmage in Warhammer online. Before implementing this template please read the “Weakness” section. With this build you can easily keep your allies up, you will have the most healing possible on the Order side in Warhammer online.

  • Willpower = adds to your % chance to disrupt hostile spells and adds to healing power in Warhammer Online
  • Wounds = adds to hit points in Warhammer Online
  • Initiative = Increases your chance to dodge ranged attacks, detect stealthed opponents and makes it more difficult for enemies to critically hit you in Warhammer online.

The 25 points will be placed as follows: (There will be a few extra points due to RvR rewards, however we will not use them here)

15 in “Isha”
Buy the following skills in the Isha tree for one point each:

  • Balanced Mending
  • Balance Essence
  • Funnel Essence
  • Wild Healing
  • Magical Infusion
  • Winds’ Protection

Skills in the tree you do not buy: “Bolstering Boon”.

The last 4 points will be put in the “Vaul” tree. Any additional points should also be placed in “Vaul”, there is no reason to buy the bottom skill in the tree.

80 RvR points to be placed in:

  • Resolve level 1 = 1 point
  • Resolve level 2 = 3 points
  • Resolve level 3 = 6 points
  • Resolve level 4 = 10 points
  • Resolve level 5 = 14 points
  • Impetus level 1 = 1 point
  • impetus level 2 = 3 points
  • Discipline level 1 = 2 points
  • Discipline level 2 = 4 points
  • Discipline level 3 = 6 points
  • Spiritual Refinement level 1 = 5 points
  • Spiritual Refinement level 2 = 10 points
  • Spiritual Refinement level 3 = 15 points

The purpose of this build is to be able to put out the most healing possible.
Here are the planned active morale skills:

  • Level 1 = Divine favor
  • Level 2 = Rampaging Siphon
  • Level 3 = Divine Protection
  • Level 4 = Winds’ Protection

Slotted Tactics can be changed “on the fly”, as long as you are not in combat. Since there are 5 quick slots available, I would use each one in a different situation. One for PvP fight, one for PvE Group, and one for PvE solo. Here is my choice for a “PvP fight”(Heal):

  • Master of Tranquility
  • Discipline
  • Balanced Mending
  • Wild Healing

Build Strength:

No one on the order side in Warhammer Online can out-heal this build, this is simple raw healing that cannot be matched.

Build Weakness:

Extremely weak in PvE Solo. You may wish to play a “DPS” build and then implement this when you hit 40 for PvP healing. You will really be hurting if you try to use this build in PvE solo.

Warhammer Online Build: Shadow Warrior template


This will be a “Distance” build, concentrating on ranged and ranged AOE attacks.

  • Ballistic Skill = Increases ranged damage
  • Wounds = adds to hit points
  • Initiative = Increases your chance to dodge ranged attacks, detect stealthed opponents and makes it more difficult for enemies to critically hit you.

The 25 points will be placed as follows: (There will be a few extra points due to RvR rewards, however we will not use them here)

15 in “The Scout”
Buy the following skills in the “The Scout” tree for one point each:

  • Enchanted Arrows
  • Glass Arrow
  • Festering Arrow
  • Guerrilla Training
  • Fell The Weak
  • Rain of Steel

Skills in the tree you do not buy: “Leading Shots”.

The last 4 points will be put in the “Assault” tree. Any additional points should also be placed in “Assault”, there is no reason to buy the bottom skill in the tree.

80 RvR points to be placed in:

  • Marksmen level 1 = 1 point
  • Marksmen level 2 = 3 points
  • Marksmen level 3 = 6 points
  • Marksmen level 4 = 10 points
  • Marksmen level 5 = 14 points
  • Impetus level 1 = 1 point
  • impetus level 2 = 3 points
  • Sharp Shooter level 1 = 2 points
  • Sharp Shooter level 2 = 4 points
  • Sharp Shooter level 3 = 6 points
  • Sure Shot level 1 = 5 points
  • Sure Shot level 2 = 10 points
  • Sure Shot level 3 = 15 points

The purpose of this build is to be able to stay in the back and deal out decent single target and AOE damage to thin out the healers and nukers.

Here are the planned active morale skills:

  • Level 1 = Lileath’s Forgiveness
  • Level 2 = Unshakable Focus
  • Level 3 = Explosive Shots
  • Level 4 = Rain of Steel

Slotted Tactics can be changed “on the fly”, as long as you are not in combat. Since there are 5 quick slots available, I would use each one in a different situation. One for PvP fight, one for PvE Group, and one for PvE solo. Here is my choice for a “PvP fight”:

  • Steady Aim
  • Guerrilla Training
  • Instinctive Aim
  • Enchanted Arrows

Build Strength:

Decent ranged DPS, including above average AOE damage.

Build Weakness:

No melee skills, as such STAY at range using this build.

Death Knight RANGED EXPLODE!


This is a new exploit which I’ve found pretty useful in pvp after hitting 80 last night.

You need to be specced far enough into Unholy to get the Shadow of Death talent that will transform you into a ghoul to allow you to keep fighting for a period of time.

I’ve noticed in level 80 bg’s that your ghoul form is almost useless as it will get bursted for so much that you can hardly get off any spells before dying, so a quick explode to release your spirit is most efficient. (unless your target’s at like 5%)

What this trick does is keep you from dying in ghoul form to anyone in any situation, especially PvP.

What you need to do is use explode, which normally has a short casting time. If you stand still and try to explode, you will almost immediately be stunned or interrupted. Moving also seems to interrupt the cast.

But for some reason, your lunge skill does not. This means you can make a macro like this:

/cast Explode
/cast Lunge

You are now able to cast explode and then lunge toward anyone you have targeted, without getting your explode interrupted. This is useful in two different ways, as you can now explode on targets that are as far away as your lunge, finishing off anyone under 3k health, or target someone far enough away just to get the hell out of the middle of everyone.

Using this method I’ve been able to consistently keep an undefeated record in all BG’s as no one can kill me in ghoul form in the 2 seconds that my explode is secretly being casted under my lunge.

I scrapped up a quick clip of the process here:
(note, I didn’t have my macro out at the time, so I didn’t explode on top of the enemy. but you can still see that casting is not interrupted by the lunge)

Guide Map to WINTERGRASP (Open-world PvP)


Wintergrasp makes up a large portion of the region between Sholazar Basin, the Borean Tundra, the Dragonblight, and the Icecrown Glacier. Wintergrasp is the first open-world PvP region for World of Warcraft. The main focus of the battle will be siege
weapon warfare and promises exciting action between the Alliance and the Horde.
The Alliance and the Horde fight for the control of a valuable mining resource. One faction will have to defend the keep while the other assaults it. Towers and siege workshops can be controlled and used for victory.

If the attacking faction successfully captures the keep, they will defend it during the next scheduled siege. Siege weapons are needed to destroy the walls and capture the keep. There will be daily quests and rewards in the area and can truly be a new experience for PvP and PvE players alike.


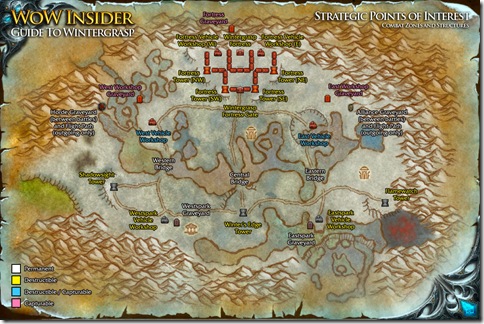
Points of Interest

zach_wintegrasp_guide_points

Familiarize yourself with the zone and all the structures. Some building are capturable, others are destructible, and others can be captured or destroyed.

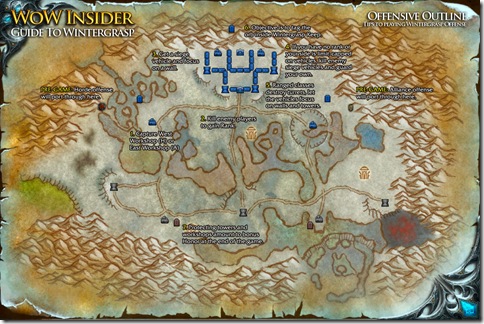
Offensive Outline

zach_wintegrasp_guide_offense 

Here are a few tips when playing Wintergrasp offense. The main idea is to hit the keep hard with siege vehicles.

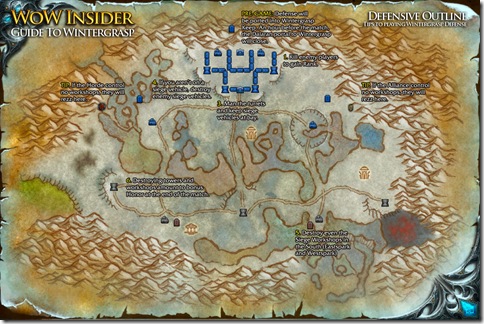
Defensive Outline

zach_wintegrasp_guide_defense

If your faction is defending Wintergrasp, remember that the best defense is a good offense. Destroy enemy workshops and man the cannons.

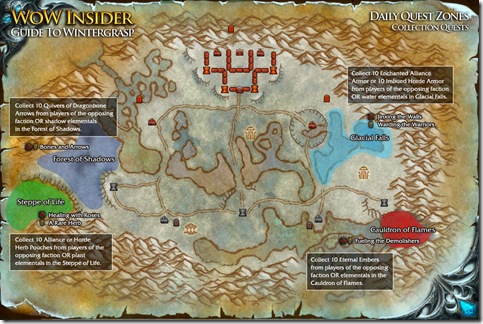
Daily Quest Zones

zach_wintegrasp_guide_quests

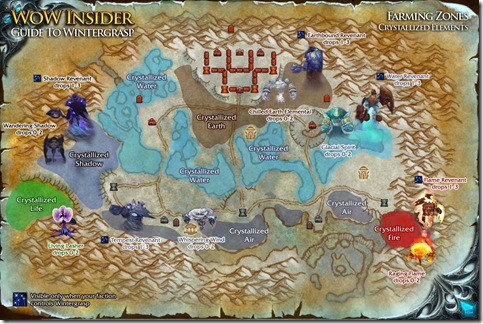
Aside from quests directly related to the battle, there is a daily collection quest that requires players to get drops from other players and elementals.

Elemental Farming Zones

zach_wintegrasp_guide_farming

Speaking of elementals, Wintergrasp is the best place in Northrend to farm for elements. Players controlling the zone can ’see’ greater elementals that drop 1-3 crystallized elements 100% of the time.

Wintergrasp Ranger

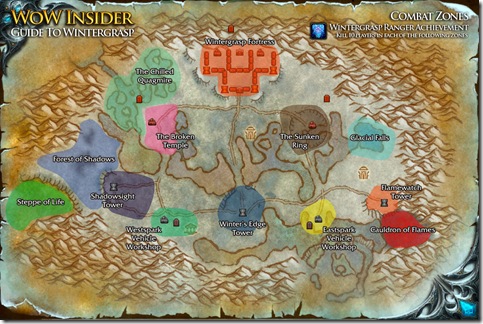
zach_wintegrasp_guide_ranger

One of the more difficult Achievements in Wintergrasp is to slay 10 enemy players in several areas in the zone. Here’s a map to generally show where each area is. The hard part then is actually finding players to kill.

Ranks:
As you participate in Wintergrasp PvP, you gain ranks in the form of a buff. After defeating more enemies, you go up in rank and these grant you the abilities to use siege weapons and give you bonus honor and more. The ranks start with your first killing blow as Recruit, and then go on to Private, Corporal, and First Lieutenant as the highest.

Siege Weapons:
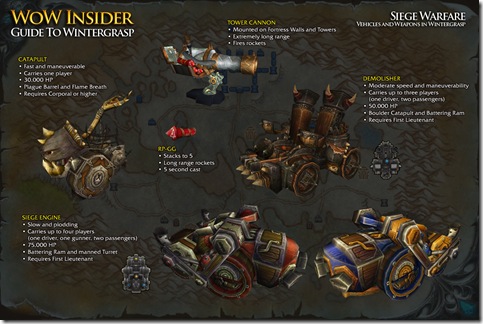
Siege weapons can be obtained from siege factories in order to capture or defend the keep. Players need to attain higher ranks to access the more powerful vehicles.
Vehicle Name Seats Rank Requirement

Siege Weapons

zach_wintegrasp_guide_siege

There are a number of tools you can use to win the battle, from rocket launchers to full-on tanks.

Future Weapons

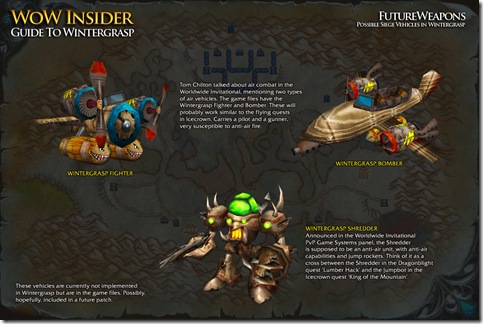
zach_wintegrasp_guide_future

Flying machines and goblin shredders were announced at the Worldwide Invitational but have yet to make it to the live realms. Let’s keep our fingers crossed, hoping to see more mayhem!

Stone Keeper’s Shards
Players are awarded Stone Keeper’s Shards when you complete the daily tasks in Wintergrasp.
These are used to buy heirloom items and enchants for PvP use.

  • • Arcanum of Dominance – 29 spell power and 20 resilience (Head, 40 shards)
  • • Arcanum of Triumph – 40 attack power and 20 resilience (Shoulder, 30 shards)
  • • Inscription of Dominance – 23 spell power and 15 resilience
  • • Inscription of Triumph – 30 attack power and 15 resilience

Monday, December 15, 2008

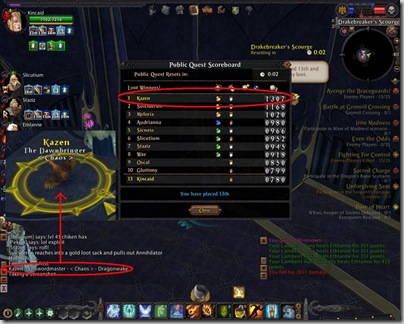
Warhammer Online: How to increase your chances on a gold bag in a keep raid


Many may wonder why some people got #1-3 quite often during a keep raid and asked how you could improve your own contribution/ranking during a keep raid? Most people on official Forums may told you to actively participate on the keep raid, don't go afk and do as much damage/heal/tanking as possible will make sure you're on the top.

However, this is not completely true. Mythic was to stupid to develop a full functional contribution system which will reward people accordingly to their effort in the public quest/open RvR. Instead they simply determinated the player will get a hidden roll each time he enters a certain zone/pairing which will determinate his contribution.

This was confirmed by many peoples on the Warhammer Alliance forum. Some people always got #1 in 3 different keeps (within the same zone/pairing) 2 out of 3 times with being half afk and not doing anything at all.

Basically: If you're on a low rank (let's say 10-30+), your best bet is simply to zone out and zone in again (log out/in should work too) to get a new "hidden roll" associated with your character.

(Source: Warhammer Alliance Forum)

There is also another cheat/exploit you can use, to increase your chances. It's also quite easy and really not understandable how stupid this guys over there at Mythic are to program such a shit. If you're using the ram on both gates (jump inside and use it and not just place it down or attack the gate with your skills) the chances are very good that you will land at ranking 1-3 each time.

Happy gold bag grabbing

Update: Another proof for the theories above (click for zoom)

Chicken-Open-RvR-Contribution

So how could a chicken, do enough damage to get silver medal and roll high enough for #1?

Sunday, December 14, 2008

Warhammer Online: Mourkain Temple Scenario - Conclusions and Final Analysis


Final Analysis

Victory in Mourkain Temple comes down to two very simple things:
Grab the artifact first.
Kill more of them than they kill of you.

Holding the artifact means you do not have to kill as many of them as they have to kill of you, which is why turtling is such a powerful and effective strategy. A few helpful tips:

1) Make use of line of sight to protect yourself from ranged DPS. The temple, hills, roots, and trees all provide numerous places to duck behind.

2) Pick your moment to charge the carrier.
When the Artifact has been freshly passed off, the DoT will be small and the carrier will be the least vulnerable. This is the time to kill stragglers, aggressive enemies, and healers or ranged DPS. A few minutes after a swap is the ideal time to charge the carrier. The DoT should be ticking for 1500+ damage by then, and even with heals it will be hard for the carrier to survive an aggressive assault.

3) Attack the carrier from different directions. If a frontal attack fails, start circling around the sides. The only way to break the turtle sometimes is to surprise them. Hit from the side and focus all your damage on the carrier. Then try to book it out of there as quickly as you can.

4) Heal your carrier - especially a brand new carrier. Keep your carrier alive unless it is time to pass off the artifact. Speaking of which, healers should pay attention to scenario chat so they know when it is time to STOP healing the carrier. If someone on your team manages to gank their carrier and charge off with the artifact, heal them as much as possible as fast as possible.

5) Don't Turtle! It simply is not fun. There was a time on some servers where teams actually did not use the turtle strategy, and Mourkain Temple was a lot of fun. Players have the power to bring that back.

Conclusions

Mourkain Temple can be a very fun scenario, but the few glaring flaws often ruin it. The fact that it pops far more often than the other two Tier 2 scenarios means most players spend the majority of their T2 scenario life in Mourkain Temple. When every match is a turtle from one side or the other, it gets extremely repetitive and boring. I often find myself queuing for Stonetroll and Phoenix Gate only to simply mix things up.

When the teams are fighting instead of turtling, Mourkain Temple can be an enormous amount of fun. The temple is a fun place to fight, and frantically trying to grab the artifact from each other can be very exciting. It is almost tragic that the artifact does not reset every time it is dropped. One simple change could make this a really amazing and extremely fun scenario.

Warhammer Online: Mourkain Temple Scenario - More Suggestions for Improvements


Specific Improvements for Mourkain Temple

No Mounts

The rank range for this scenario is 8 to 21 (though honestly, 12 to 21 is the appropriate rank range). Rank 20 and 21 players have mounts, but everyone else does not. Mounts can outright determine which team starts with the artifact. Because starting with it first is such a huge advantage, it really hurts the overall "fairness" of the scenario to have such an advantage to the team with rank 20+ players. One of the many great things about RvR in Warhammer Online is that rank is not such a huge determiner of victory. The bolster system and the tier system let people of all ranks participate effectively in RvR. It would be best if mounts were disabled in Mourkain Temple (as they are in Tor Anroc, by the way).

The only problem with this idea is the fact that it would then change things to giving the artifact to whichever team had a Marauder/White Lion. This could easily be fixed by letting the artifact spawn after a certain amount of time (which is more than enough for all people to gather at the spawn point and already start fighting for control of the artifact spawn zone.

Do Not Allow Healing or Attacking from the Spawn Area

Players that have not dropped down from the spawn area should not be allowed to heal, buff, debuff, or attack. They should have to enter the field of battle if they wish to do anything to help their team or hinger the opposing team. This is particularly true since one realm has greater "reach" from their spawn area. If the first suggestion was implemented, this would be less of an issue, but it would still be worth doing just on principle.

But there is also a risk that the enemy team would do spawn camp the inferior team if the attackers are strong enough. Good example can be seen in World of Warcraft Battlegrounds where a high equipped/organized group would push back the other team to their spawn points and camp them there while 1 or 2 people complete the battleground objectives (i.e. capture the flag) without any resistance.

Saturday, December 13, 2008

Warhammer Online: Mourkain Temple Scenario - Suggestions for Improvement


General Scenario Improvements

If you read my guides, you might notice I harp on this a lot. But it is very important, so it is worth mentioning.

Longer Delay Before the Scenario Begins

What's the rush? Give people time to zone in, get buffed, and discuss strategy. Another 1 or 2 minutes would not slow down the action. On servers or at times of the day when scenarios are not popping fast, the crazy rush makes even less sense. Help ensure a fun scenario experience by giving people time to get off to a proper start.

Immunity Timer When Zoning Out

What is the purpose behind zoning people out of a completed scenario with no immunity timer, so when they finish zoning they are dead or nearly dead to NPCs? What is the harm in a 30 second timer where they are immune and cannot attack? There seems to be an institutional belief that players should not be out fighting in the PvE world between scenarios. This makes no sense. A huge part of the fun of Warhammer Online is the fact that you can do so many things at once. You can PvE some, RvR some, do scenarios some, and go back and forth almost at will. It keeps your game play fresh and prevents boredom. Do they really expect people to just stand around idle in a warcamp waiting for scenarios to pop? What if someone plays on a low population server or plays when scenarios are not popping fast?

Warhammer Online: Mourkain Temple Scenario - Fun Strategies


Fun Strategies

Perhaps there are people who enjoy the ultra repetitive turtling strategy. I certainly do not, and from everything I have read in the Warhammer Online blogosphere it would appear most people dislike it. But fear not, there are actually some FUN winning strategies as well.

Hold the Temple, Crush Your Enemies

While it is still important to back up a little after claiming the artifact, it is not necessary that you flee all the way back to your respawn point. Simply backing up to the entrance of the temple on your side of the map is good enough to let your realm mates crush the enemy in front of you. This is especially true if your team has a lot of tanks and melee DPS. The structure of the temple provides excellent line of sight obstructions to duck behind when ranged DPS gets too heavy.

If you can keep the fight on the
opponent's side of the temple you do not even have to worry as much about passing off the artifact. You can simply recap it from its original location if your carrier accidentally dies with it. This is not ideal (it is much better to have someone nearby), but it is good to have this backup option. If you think you can safely control the artifact spawn location, this could open up the opportunity to let a ranged DPS hold the artifact and unleash high point death from afar. When he or she falls, you simply recap it.

Passing off the Artifact

The carrier of the artifact is subject to a continual DoT that cannot be dispelled. The DoT hits for more and more damage the longer the carrier has the artifact. Eventually it will get so large that it cannot be healed through. Once the artifact starts doing more than 1000 damage per tick, the carrier should inform his or her team how big the DoT is. When it starts to become unmanageable, the carrier should try to convince another team member (preferably a tank) to withdraw from battle and come stand next to him or her. At a lull in the fighting (if possible), healers should stop healing the carrier so the DoT can kill him and the designated new carrier can quickly pick it up.

When the artifact is dropped, there are only a few seconds to click on it before it returns to the original spawn point. The range for clicking on the artifact is actually very long. It can be grabbed from quite some distance away. So try to make sure there is a line of sight obstruction between the dying carrier and any potential enemies.

Know the Score and the Time

The score and the time can dictate changes in tactics. If you are losing a close game, but have the artifact, it might be a good idea to have your carrier go ahead and devote full effort to fighting. This is the equivalent to "pulling the goalie" in hockey. Kills by the artifact carrier are worth more points, and those points could be enough to pull ahead in the last minute of a scenario, or it might get you to 500 just before the other team.

If you are losing and do not have the artifact, you might as well forget the carrier in the last minute or so of the scenario and just try to get a few kills. Earning a little more experience and renown is a good thing.

Friday, December 12, 2008

Warhammer Online: Mourkain Temple Scenario - Winning Strategies


Winning Strategies

Mourkain Temple is a very straightforward scenario, which is both good and bad. The good part is that the lack of complexity generally results in a lot of action. The bad part is there is really only one way to win and thus little room for interesting, clever tactics.

There are really only two main ways to play this scenario. One is exciting and fun, the other is a pretty lame and repetitive. Unfortunately, the second is far more common. Sadly, it could all be remedied with a few improvements to the scenario.

Turtling or Hedgehogging

This is the standard strategy most people employ from both realms. It involves the carrier of the artifact immediately running back to their spawn location and hiding right underneath it. The carrier is then surrounded by members of his team, who (with the aid of ranged attackers from the spawn point) slaughter anyone who tries to kill the carrier.

Far too often, the only real challenge in Mourkain is getting the artifact first. The majority of scenarios are won by whoever gets it first. This is a real shame, because a lot of potential fun is wasted. The advantage to holding the artifact near your spawn point is enormous. Anyone on your team who dies is back in action really fast, whereas opponents who die must spend at least an extra minute or so before they get back. Ranged attackers, healers, and rezzers can often stay safely above the battle without even jumping down from their spawn point. This is especially true for order who tend to have more ranged DPS.

Order tends to turtle up behind a broken wall near their spawn point. Destruction tends to turtle up inside or behind a hut at theirs.

A team using the turtle strategy needs to remember that killing people is still the main source of points. If you are turtling but the other side out kills you significantly, they can still win. This happens sometimes when the carrier team is melee heavy and the other team is ranged DPS heavy. They can stand back and slaughter your "defenders" over and over. Any attempt to get at them in small numbers simply results in dead melees 1-99 feet away from the ranged DPS. This speaks to the huge imbalance in favor of ranged DPS in WAR, but that is a different issue.

Beating the Turtle

To beat the turtle, you need to either farm their defenders from range (as described above), or gather your entire team for a powerful attack on their carrier. If you wait a minute or two after the initial clash, you can get all of your respawns together and strike when the DoT damage from the artifact is starting to get heavy.

You will really have to fight effectively and focus fire if you hope to beat the turtle. The advantage to turtling is just enormously big in this scenario.

It might help to pick off a few stragglers or bored/aggressive members right before you make your big rush. This puts the numbers in your favorite for 1-30 seconds at least.

Warhammer Online: Mourkain Temple Scenario - Beginning and Basic Information


Scenario Basics

Type: Murderball

Duration: 15 minutes

Winning Condition: First team to 500 points, or highest points at the end of duration.

Tier: 2

Player Ranks: 8 through 21

Number of Players: 12 per realm

Score:

  1. Killing a player: 5 points
  2. Killing a player while holding the artifact: 10 points
  3. Killing the artifact carrier: 10 points
  4. Holding the artifact: approximately 3 points every 5-10 seconds

Once it Begins

Unfortunately, the first 30 seconds of Mourkain Temple are extremely important. You need someone to grab the artifact as quickly as possible so your team can start racking up points. If there are any level 20+ players on your team, they can mount up and get to the temple fast. Alternatively, White Lions and Marauders have multiple sprint-type abilities that can get there about as fast as a mount. 

You grab it by clicking on it and watching a 2 second timer. If there are multiple people there, you better hope you clicked first. Once you grab it, you definitely want to back up a bit towards your spawn location so your team can catch up. There is usually quite a battle right away as the team that failed to grab it tries to kill the carrier. The team with the artifact generally tries to retreat with it (sadly, back to their spawn area usually).

If you have any AoE roots or snares, use them here whether your team grabbed the artifact or not. Slowing the other team's retreat or chase are both good things. This is also a good time to AoE the enemy if you can, as most of your foes will be frantically trying to pummel the brightly glowing carrier into dust.

If you are the carrier, work hard to break line of sight at every opportunity. Enemies will be nuking you and dropping DoTs and CC on you as rapidly as possible. Help your healers by giving them time to let HoTs tick and dispel DoTs or CC abilities.

If you pull back only a short distance, you might be able to get a few quick kills on whatever overly ambitious melees charge forward. This helps your team get some quick points.

If your team fails to get the artifact, then it is off to the races. Most of your team will charge forward and try to get a quick kill on the carrier. Usually this fails. Most of the time the carrier is able to get safely behind his own lines.

Warhammer Online: Mourkain Temple Scenario - Summary


Official Summary

Find the Mourkain artifact and seize it for your realm. Killing the enemy while carrying the Mourkain Artifact will yield more points, but slaying the artifact bearer also yields increased rewards. Carrying the Artifact will inflict damage to the carrier over time.

(Source: Mourkain Temple loading screen)

Official Details

From the Warhammer Herald:

"Hold the ball and you'll get points over time, as well as points for killing other players - more points than you would normally! If you're killed while holding the ball, the other team will get double your normal kill value... and of course you drop the Murder Ball! As with all Murder Ball Scenarios, you will take damage for as long as you're carrying the artifact... power has its price!

Both Realms start this map on opposite sides of the Mourkain temple ruins. At the center of the temple lies the Mourkain
Artifact. The swampy terrain and temple provide an impressive backdrop for this Scenario. Players who are swarthy and use their sprint ability wisely will make it to the Artifact first, and gain the upper hand. Teams that stick together and protect the Artifact carrier will find this Scenario easy to win. In a way, Mourkain is reflective of our open field combat in the Marshes of Madness, but with the added satisfaction of chasing down a specific target. Teams that flank and use the whole terrain will be able to shake free the Mourkain Artifact from their opponents grasp. Use the swampy terrain and vines to break line of sight, and always be on the move in this Scenario. Staying still will net you a quick death, and possible loss of the powerful Mourkain Artifact!"

Where and How to Join

Mourkain Temple is located in the Marshes of Madness, which is part of the Dwarf vs. Greenskin pairing.

You can queue for the scenario from any Tier 2 zone by clicking the icon that is located at approximately 11 o'clock on your mini-map. This opens the scenario queue interface. You can then pick scenarios to join solo or as a group. You can also join all available scenarios with a single click if you choose. Note that when you use the Join All button the scenario code slightly biases you towards the scenario(s) located in the same pairing as the zone you are physically located in.

Quests

While you can queue for this scenario from any Tier 2 zone in the game, you can pick up quests for the scenario in the Marshes of Madness and Barak Varr warcamps. These quests can be completely an unlimited number of times, and they will net you a few thousand experience and a good amount of silver each time you turn them in.

Thursday, December 11, 2008

Warhammer Online: Nordenwatch - Suggestions and Conclusions


Suggestions

Nordenwatch is an excellent, very fun scenario, but there are still ways in which it could be made better.

Longer Delay Before Beginning

This is a problem with all scenarios in Warhammer Online right now. They start too quickly. If you enter the instant the scenario window "pops", by the time you zone in you are lucky if it is 30 seconds until the scenario begins. Many members of your team will not even be in yet, as they might have been in combat when it popped, or they might load slowly. An entire scenario can be ruined simply
because a few people got in late. This can result in the first fight being a disaster for one side, and the other side setting up an unassailable defensive position before things are finally equal. The short delay also makes it hard to get everyone buffed, and virtually impossible for ANY kind of strategy to be discussed. They should add 1-2 minutes to the starting delay. This would improve things enormously.

Do Not Let Unbalanced Scenarios Begin

12 on 8 is no fun. 12 on 10 is rarely fun either. Hold the beginning of the scenario until both sides have the same number of combatants. This one is so obvious I do not understand why the system does not work this way.

Let People Join Even While in Combat with NPCs: This is another general scenario issue. Since the game lets you join when dead (with no death penalty) why does this limitation even exist? All it does is waste time as the player has to either finish the combat, run far enough away to get out of combat, or hurry up and die. This is nothing but a huge inconvenience.

Give People 30 seconds of Immunity when they exit the scenario

Again, this is a general scenario issue. There is no excuse for zoning out of a scenario and being dead before you finish zoning (or < 10% health). It is like they expect people to stand around in a war camp doing nothing between scenarios. This is impractical (as sometimes queue times are long) and pointless (as one of the strengths of WAR is being able to do so many things tat the same time).

Less Points for the Fortress Capture

Change it to 20 points. There is too much emphasis placed on the Fortress.

Less Points for Holding the Fortress

Some people think it is 2 points per tick, but in practice it appears to be 4. Change this to 3, and it would be much better. That would mean holding the other 2 is better than the Fort. This is a good reward for how much harder it is to hold Barracks and Lighthouse.

Conclusions

Nordenwatch is enormous fun and it is a great introduction to RvR in Warhammer Online. It is probably the best Tier 1 scenario, and in the end it is one of the best scenarios overall. You get into the action fast, and you get back into the action fast even if your team is losing. It is well designed, balanced, and a great way to start off any character's career.

Tuesday, December 9, 2008

Warhammer Online: Nordenwatch - Losing Strategies and Things to Avoid


Losing Strategies

Gank the Other Realm's Spawn Objective:

Occasionally, one team will send 1 or 2 people to the opposing realm's spawn objective to try and get a sneaky capture. This strategy might seem to work at first, and may seem very appealing. But in practice this only accomplishes two things:
Virtually guarantees a loss at the Fort since your team will be outnumbered. The Fort is worth double the capture points of the Barracks or the Lighthouse, so this is a net loss of 15 points.
The opposing team will almost certainly capture it right back when their respawns roll through and probably outnumber whoever capturedit. This gives 15 points to the other team, which nullifies the initial capture points. So now you have a net loss of 30 points.

Worst Case Scenario: A couple members of your team run across to capture their spawn objective. They flip it from controlled to uncontrolled, but soon after get killed by respawns or nearby enemies. The enemy then recaptures it for themselves. During this time, the enemy also takes the Fort due to their numerical advantage. This results in a net loss of 45 points (30 points for the Fort, 15 points for recapturing their spawn objective, and none for your team). This also means the opposing realm got 60 or so points for kills (since they probably killed all 12 of your team), and due to being outnumbered your realm may very likely have received 0 kills. So within the first couple minutes of the scenario, your realm is already down 120 to 0. Brutal.

Nothing Else Matters... GET THE FORT!

This has been addressed elsewhere, but it bears specific mention as a losing strategy. Throwing yourselves repeatedly at the fort will accomplish nothing but give the other realm a lot of easy, fast points, renown, and experience. This is particularly true if subsequent attacks on the Fort happen haphazardly as your fallen allies straggle in after various respawns. This strategy frequently degenerates into fighting half way between your own spawn objective and the Fort. This means you never even threaten the Fort in a serious way, and they enemy just farms you at their leisure.

Things to Avoid

Yelling "HEAL!" or other criticisms of the healers. While it is possible the healers on your team are bad, one or more of the following is more likely:

1) They are overwhelmed. You might have too few healers, or their level may be such that there is not much more they can do.

2) They are constantly under attack and/or nobody is helping them shed attackers.

3) You simply charged ahead foolishly, got focus fired, and were out of healing range or (rightly) deemed not worth healing due to your own recklessness.

4) The other team is simply better. If the other team is delivering ferocious DPS, your healers will simply be unable to keep up.

Insist that the only way to win is to hold the Fort. I think this has been addressed sufficiently, but it really needs to be driven home.

Calling your teammates stupid, noobs, fools, or any other insult. Tier 1 is a chance to get to know people on your realm. These are people you may be fighting with for many months or years to come. They may be learning how to play MMOs for the first time, or learning a new class archetype. No matter how badly you think they are playing, these are your teammates for now and perhaps for the future. Helping them learn is a much better idea than criticizing them for failure. Furthermore, the failure may be your own and not theirs. In RvR based games, your reputation is more important than on purely PvE games. Being liked simply by 25-40 people in your guild that you raid with is not enough. You will need to be able to work with hundreds of different people if you have any hope of success in large, open world RvR.

Sunday, December 7, 2008

Warhammer Online: Nordenwatch - Aftermath of the Fortress Battle


Aftermath: Your side won the battle at the Fortress

Congratulations! Your side won the big battle at the fortress. This usually means one of three things:


  1. Your team is simply better, and will probably crush the other team repeatedly in every massed engagement.
  2. Your team played smarter, or their team spazzed and did not play smart. Perhaps your team focused fire better or you saw their key support faster. If the other team learns from their mistake (not typical) then later battles may have a different outcome.
  3. Your team had all 12 of its people zone in faster and they all got to the Fort faster. Do not underestimate the effect of this. Scenarios in WAR start extremely rapidly for some reason. For this reason, a few slow loading players could give you a false sense of accomplishment.

After this initial win, you have two main choices:

  1. Chase after your defeated foe. The reasons for doing this include: getting a few more kills, trying to capture the third objective, hoping to farm the other team at their spawn. No matter how crushing or slim your win was, there will almost always be someone yelling on scenario chat "HOLD THE FORT! DON'T CHASE!" This is good advice if your victory was slim. But if you rolled the other team hard, an aggressive strategy is probably more likely to yield fast points, heavy kills, and a quick and richly rewarded victory.
  2. Hold the Fort. If you had a very close win at the Fort, this is probably a good, safe idea. Let your team respawn and get into good position to defend the fort.

Aftermath: Your side lost the battle at the Fortress

Click that RESPAWN button and gather your forces. If you are a leader type, encourage people to hold at the Lighthouse/Barracks and wait for everyone to respawn. See the above section for reasons why you lost that massed battle. You now have two choices:

  1. Gather your forces and hit the Fort again, hoping for a better outcome. This is only a viable strategy if you lacked all 12 members in the first fight, if it was really close, or if you think your team could have won but for a few mistakes. Generally, if you lost the first all out battle at the fort you will keep losing them in a straight up 12 on 12 fight. Keep that in mind before charging off again to be slaughtered. An entrenched foe at the Fort has an distinct terrain advantage over the attacker.
  2. Send a few people to the objective near their spawn to take it. This not only gives you points, but it will probably pull a few of their players away from the Fort. You may also get to kill a few of their respawning members and dump them back in the respawn queue. If you are able to hold the objective near their spawn against 1 or 2 small attacks, that inherently means their force at the Fort is now reduced in numbers. That is the time to strike the Fort - when you have a numerical advantage.

Friday, December 5, 2008

Warhammer Online: Nordenwatch - Specific Strategies


Basic Archetype Strategies

If you play the scenario enough, you will indeed develop tactics that work best for you. But in general, this works for the various archetypes:

TANKS

Get to the flag and fight on the flag.

That is your main role in almost every engagement. If fighting near a captured objective, you can then assist DPS in taking down the opponent. If your objective is in jeopardy, once again you should fight on the flag to prevent its capture. If you have enough people holding the flag, it may occasionally be a good idea to stand with your own team's support, guard a healer, and help them stay alive.

When skirmishing, putting guard on a strong DPS player on your team can help them stay alive longer to really crush the enemy (and see them driven before you!).

MELEE DPS

If your team has no tanks, get to the flag and fight on the flag. If you have tanks, help take down healers and DPS of the enemy. When not fighting for an objective, stay with your team and work to drop the other team's support as quickly as possible. Work together and assist with other DPS players.

STEALTH DPS

If your team has no other melees, bad news... you need to fight on the flag. Sorry. Otherwise, work together with your other DPS to drop their healers and DPS.

The nature of stealth in Warhammer Online is such that scouting is really not a significant role for stealth players. 30 seconds of AP draining stealth does not give you much opportunity to scout the enemy. But there are occasional opportunities for scouting, and you should be on the lookout for them.

If your DPS is high enough, you can occasionally sneak back into the enemy's healers and drop one fast. This is always very helpful to your team.

RANGED DPS

Get in a good position that limits the line of sight of oppposing ranged DPS, and work with other DPS to crush the enemy's healers and DPS. Failure to assist with other DPS can result in a lot of wasted damage that gets healed away. You want to drop people as fast as possible and then move onto the next.

Remember that staying alive usually results in more overall DPS than going berserk and dying soon after. Backing off so HoTs can tick on you is only a brief interruption of your DPS. Blasting away until you die is a much longer loss of DPS as you must wait to respawn and runback (resurrection is rare in Tier 1 since it is learned at level 10).

HEALERS

Keep those tanks (or melee) alive who are fighting on the flag. If they die, your enemy will capture the objective. Keep yourself alive! Many healers forget to heal themselves. If there are DPS who make a habit of killing people attacking you, keep them alive! They are clearly smart players who will help you survive.

Wednesday, December 3, 2008

Warhammer Online: Nordenwatch Begins!


How it Begins

Order (blue) begins near the Lighthouse objective (blue square on page 1 map) and Destruction begins near the Barracks objective (red square on page 1 map). After the initial objective, both sides have a straight path to the very strategically important Fortress. It should be noted that Order actually has two paths, the lower of which is faster to the Fortress than any route for Destruction. Both sides should be careful to make sure at least one person actually stays and captures the objective near their spawn location. Occasionally everyone is in such a hurry to get to the Fortress that nobody stays and
caps. Generally, it is best for a low level ranged DPS to handle this duty since it is actually helpful if they arrive at the Fortress a few seconds later than the massed army.

The first clash generally happens at or near the Fortress. Assuming balanced team composition, there is usually a large melee battle at the flag with ranged DPS trying to take out each other or each other's healers. Occasionally some members of each side will try to climb the walls to get an advantageous position. This works only if the opposing side is not paying attention. Usually it is better to make use of environmental hiding spots and line of sight for defense.

Sometimes one side will send some of their DPS directly into the back ranks of the foe hoping to take out their support. If they can drop a few healers or ranged DPS fast, this can be very effective. But bear in mind time spent away from the flag is time the other side can be capturing the objective.
What Now?

Follow your team's army. Pass through (or near) the objective close to your spawn and leave 1 person behind to capture it. The rest should move quickly to the Fortress and get in position as quickly as possible. As noted, the player(s) left behind should generally be lower level, ranged DPS. They generally lose no effectiveness from getting to the big Fort battle a few moments later.

The first battle at the Fort will be very hectic. Your first few times in the scenario you may have no idea where to go or what to do. You will eventually find favorite hiding spots or places that give your foes limited line of sight to attack you. If you are playing a tank or a melee DPS, you are probably charging right into the middle so knowing what to do here is somewhat simple.

Focusing fire on the squishiest members of their team is vital here as it is in any RvR engagement. As long as you have at least one person fighting on the flag (who can survive), it is acceptable for remaining melee DPS to move into the opponent's back ranks and try to drop their healers and ranged DPS. This has to be done quickly and all together. Failure to drop them fast means whoever you left at the flag is probably moments from death, and an opposing capture of the Fort will be quick to follow.

Tuesday, December 2, 2008

World of Warcraft: Easy way to get Higher Learning achievement


Today I discovered a little nasty trick, on how to easy complete this achievement easily. But first, a little explanation on this achievement.

To get this one, you need to find and read 8 different books in Dalaran. Sounds easy, doesn't it? Well it's not. Each book has a fixed spawn within the city (see map below), so this makes it bit easier to find them. Now this book shares spawn with other - useless - books (which are however worth reading as they are pretty funny). Once you've read a book (the right one or the dummies), it will despawn after 3 minutes. The respawn timer is between 1.5 and 3 hours and chances are, that the wrong book will spawn.

Higher Learning locations map (click on the map for bigger version):

Higher Learning Spawn Locations Map

Now comes the trick: Every time a server is restarted, all the books in Dalaran will respawn, however not always the correct one needed for the achievement. So there are two easy ways to get it:

  1. You wait until Server maintenance and until the servers are brought back online and check all the spots above. 3 minutes should be enough to check all the spawns for the books. This is the most reliable way to do it.
  2. This one is more based on luck, but since the release of 3.0 patch (back in September), the servers are pretty unstable especially since the release of Wrath of the Lich King and some zones, especially Northrend, crash very often during peak times. Every time a server crashes all books will respawn too. Typically this can only be used on some high population servers which are pretty instable during evening hours.

    The typical signs of a server crash are disconnect to the login character list screen and a "World server is not available" message when trying to login. Sometimes the books doesn't respawn, this means that the server didn't crashed just that the users were disconnected from the servers. Usually the server will go down again within the next few minutes, but this time the books will be there for sure.

Have fun book hunting

Monday, December 1, 2008

Warhammer Online: Nordenwatch Summary and Basics


Official Summary

This scenario takes place in the critical beachhead of Nordenwatch. The battle rages around the Lighthouse, Barracks, and Fortress. Take and hold these objectives while killing any enemies you find.

(Source: Nordenwatch loading screen)

Where and How to Join

Nordenwatch is located in the Empire vs. Chaos pairing, but you can queue for the scenario from any Tier 1 zone. To sign up for the scenario, click the icon that is located at approximately 11 o'clock on your mini-map. This opens the scenario queue interface. You can then pick scenarios to join
solo or as a group. You can also join all available scenarios with a single click if you choose. Note that when you use the Join All button the scenario code slightly biases you towards the scenario(s) located in the same pairing as the zone you are physically located in.

Quests

While you can queue for this scenario from any Tier 1 zone in the game, there is one major reason to consider queuing from the Empire v. Chaos pairing. In the Nordland war camp for either realm, you can pick up at least 2 quests that are completed by participating in Nordenwatch. One is for simply participating in the scenario, and the other is for killing 15 players. You do not have to get the killing blow yourself - someone on your team (not the whole scenario team, your specific team) must get the kill. Doing both of these quests is a couple thousand extra experience and a nice chunk of silver. If you are near the top of the tier in rank and do not want to level out, you may choose to stop turning in the quests and save the turn in for after you hit rank 12.

If Nordenwatch scenarios are "popping" slowly for you, then you might be able to simply fly back to your Nordland war camp in between scenarios to turn in the quests and pick them back up again. There is no limit to the number of times you can complete these quests.

Scenario Basics

Duration: 15 minutes

Winning Condition: First team to 500 points, or highest points at the end of duration.

Tier: 1

Player Ranks: 1 through 11

Number of Players: 12 per realm

Score:

Fully Capture the Barracks or Lighthouse: 15 points

Holding Barracks or Lighthouse: 2 points per tick

Fully Capture the Fortress: 30 points

Holding Fortress: 4 points per tick

Killing any Player: 5 points

Notes on Scoring: Flipping an objective from one realm's control to uncontrolled awards no points. If you fail to fully capture it, the other realm can then turn it back to their control and gain capture points.

Friday, November 28, 2008

Warhammer Online: Sorceress in PvE


After the short class overview a few days ago I'm going to write a bit about the performance of the sorceress in PvE. She belongs to one of the classes which have less issues in PvE leveling, mainly due to her high damage output.

Playing a sorceress in PvE is much different from playing her in PvP/RvR. While having Dark Magic up all the time in PvP and RvR for the max. possible damage, you have to be careful if you're leveling/questing alone. Failing to take care of this, may resulting in many frustrating deaths in later game

Notice: This post mainly handles the sorceress in solo PvE play.

Leveling 1-10

The first 10 levels are pretty straightforward and basically you'll press the same keys over and over again. That's not such a big matter, as the NPCs in this level range are fairly easy. Your main skills will be Doombolt and Gloomburst. Don't even try to cast Chillwind or Word of Pain, it's not worth it. The NPCs die so quickly, that the damage over time spells won't barely do any damage. If you get additional adds you may consider or are low on HP you may consider to use Dhar Wind to load off your dark magic and use it to finish of the mob and prevent backlashes killing you. If you're attacked by two mobs, you can also throw Dread Aspect of the mob you're not attacking to reduce it's damage by 50% for 15 seconds.

Mastery Spec: Not possible yet

Tactics: Not possible yet

Leveling 11-20

Not much changes since level 1-10. Additionally to your standard nuke spells, you now also have the Grip of Fear as AoE root and starting with level 11 you finally get your first Mastery Points every second level. Doombolt, Gloomburst, Doombolt until the NPC is dead.

Mastery Spec: In this level range, it's best to invest all your points into the Agony Mastery to increase the damage done by your Doombolt and Gloomburst. Each point spent in Agony will increase the damage of your Agony spells by 5% for a total of 25% on level 20.

Tactics:
13-20: Devour Energy
Devour Energy is a very good tactics and it procs quite decently and you won't go out of AP so quickly. Later it's very useful as sometimes you can run out of AP when the enemy is at low HP. With this tactic you basically almost never run out of AP.

Leveling 21-25

Only a slight change. Starting at level 20 you can also use Frostbite, which disarms the enemy and deals some additional damage. This changes our rotation slightly. Now we start with Doombolt, Gloomburst and Frostbite to disarm the NPC, Doombolt, Gloomburst and Repeat until the NPC dies. Notice: Frostbite only works with melee NPCs and ones using bows/crossbows, it won't work on casters.

Mastery Spec: Same as above, pump in all your points into Agony to increase your direct damage skills by 45-50%. Once you hit 25, you may consider to respec. More below.

Tactics:
21-25: Devour Energy + Endless Knowledge
Endless Knowledge is one of the more powerful tactics. At the lower level it Intelligence Bonus is fairly low, but with every level you gain it gets more powerful and the tactics results in a fairly significant increase in damage.

Leveling 25-30

At level 25, we hit the first point where it's worth to change your mastery. For solo play, a calamity spec is the best way to go. The main reason is Hand of Ruin. Good thing on Hand of Ruin is, that it's a channeling spell on a 11 sec cooldown (effectively it's 5 seconds, as the channeling itself has a duration of 6 seconds). It deals damage every 2 seconds for approximate the damage of a Doombolt and has no cast time pushbacks. At this point the usual spell-rotation looks like this: You start with a Doombolt, Gloomburst and finally Hand of Ruin. This is usually enough for most of the NPCs, if the NPC is still alive you can cast an additional Gloomburst or Surging Pain (the AoE Spell, its good for finishing because it's instant)

Mastery Spec: Hitting level 25, it's time to change your spec. At level 25, you invest 9 points into Calamity and buy Hand of Ruin with your 10th point. Any other point should be spent to increase the mastery level to mastery level 13 (which you can reach at level 29). The last point, you get with level 30, needs to be spent on absorb vitality, which is quite useful as it heals you for the amount of damage it deals.

Tactics:
25-30: Devour Energy + Endless Knowledge

Leveling 31-40

You have almost done it. At level 30 you Reckless Gathering, very helpful skill to recharge your AP quickly (Notice: Can only be used when you're not being attacked by an NPC other you will suffer a 3 second knockdown). Additionally with the Close Quarter tactics, you will deal significantly more damage and the NPCs will go down pretty quickly. If you have the choice, try to stay very close to the enemy when pulling (be close than 45 ft) so you do additional damage as from the beginning.

If it's not possible (because there are to many mobs between your and your target), then pull it with Gloomburst (instead of Doombolt) and cast Doombolt as second spell. In the meantime the mob will get close enough before the casting is done, dealing 25% additional damage and then cast Hand of Ruin.

Mastery Spec: Up to level 33 you'll spend your points to get your Calamity Mastery to level 15 and get the Rank 4 morale ability. The next 7 Mastery Points should be spent in Agony. 5 points in Agony mastery level and the remaining 2 points for Recover Energy and Echo of Power

Tactics:
31-39: Endless Knowledge + Close Quarters + Devour Energy/Bathing of Blood
Endless Knowledge and Close Quarters are the best combination for PvE. Close Quarters increase damage done by 25% if the enemy is within 45 ft.
40: Endless Knowledge + Close Quarters + Devour Energy + Bathing of Blood/Sleight of Hand
Sleight of Hand is of course only useful when you're leveling in a group (i.e. doing instances, public quests or city raid which is mainly PvE)

Tuesday, November 25, 2008

Warhammer Online: Sorceress Review


Overview

Dark Elf SorceressThe sorceress is the dark elf ranged dps class. She wears cloth armor and her protection is very low, but her damage is very high and you shouldn't underestimate her. She can specialize in three different Masteries: Agony (Single Target Spells), Calamity (Damage over Time effects) and Destruction (Area of Effect) spells. Each of the Masteries have their pro and cons.

Mechanics

The mechanics of the sorceress are quite unique in the world of MMOGs. The more magic the sorceress uses, the more dark magic she gains resulting in more powerful spells. Almost every spell casted, will increase her chance to land a critical hit and the critical damage up to 200% damage and +50% chance to crit but also has a 60% chance to cause a backlash damaging the caster itself. The trick is to manage your dark magic to not blow up yourself

Mastery: Agony

Agony focuses on single target direct damage spells and increase their damage as well unlock some new spells. It's not a very good Mastery in the late game, as it requires you to stand for long time and force you to use Doombolt as your main spell which has a very long cast (3 seconds). You will find yourself often, that the enemy runs out of range/line of sight and your cast cancels, dealing no damage. However, it's pretty nice in the early game (first 20-25 levels) for leveling, as the better AoE/DoT spells are unlocked at higher levels.

Pros

  • High single target damage
  • Good for levels 1-25

Cons

  • Long cast times and cooldowns on related Agony spells
  • Doombolt is canceled very often or interrupted due toe loss of line of sight or target running out of range
  • Not many good skills/tactics to be unlocked

Mastery: Calamity

This mastery focuses on damage over time (DoTs) effects and get really interesting once you hit level 25 where you get a channeling DoT which will become your main damage spell. Besides that, there are some other nice spells you can get with this Mastery, like a healing DoT. Very good for leveling/solo PvE as well as for PvP

Pros

  • High mobility
  • Can heal yourself
  • DoTs dealing damage even when victim runs out of range
  • Strong channeling spell

Cons

  • Applying all DoTs is time consuming and victim often dies before you're done
  • Low peak damage
  • Low dps due to damage over time effects

Mastery: Destruction

Destruction is the mastery of area of effect spells. This mastery can get very powerful if you're able to hit many persons who are close to each other, like in a keep or city raid. It is very powerful mastery in this areas. On the downside, it's not very good in the early game unless you're leveling with a group and have at least one decent healer to keep you up.

Pros

  • Strong area of effect spells
  • Very powerful on keep and city raids

Cons

  • Easily to get agro from nearby mobs
  • Weak DoT/single target spells

Summary

In the next few days I'm going to write an extensive review on PvP/PvE performance and some tips & tricks.

Strengths

  • High spell damage
  • Very long range spells
  • Strong area of effect attacks

Weaknesses

  • Vulnerable to Melee
  • Light Armor
  • Spells can backlash

WTBBlue’s WOTLK Guide to Alchemy 375-450


This is a speed guide and will go over the quickest and cheapest way to level alchemy from 375-450 - with alternative recipes listed whenever it makes sense. Given that none of the professions will be finalized until November 13th this guide will be revised and completed when Wrath of the Lich King is released - however the basic patterns for Alchemy looks pretty complete at the moment so the final build should be similar (if not cheaper to level) to the current beta as of 09/26/2008.

Leveling Guide

From 375-390:
Elixir of Spirit (3 x Talandra's Rose, 1 x Imbued Vial) x 15
(Optional) Crazy Alchemist's Potion (2 x Goldclover, 1 x Imbued Vial) x 15
You can craft either of these depending on which herb's you have more of - however I'd highly recommend the Elixir of Spirit first since Crazy Alchemist's Potions could level you all the way to 430 at the moment

From 390-430:
Crazy Alchemist's Potion (2 x Goldclover, 1 x Imbued Vial) x 64
Woah really? Actually at the moment this will stay yellow till 422 and with the crazy cheap materials, how can you lose? Note that when you hit 422-430 the recipe will be green, so it'll take a lot more crafts per skill up but is still the easiest way to hit 430.

From 430-435:
Transmute: Titanium (2 x Cobalt Bar, 8 x Saronite Bar, 2 x Crystallized Life) x 5
Unfortunately the only way at the moment to move from 430-450 is through transmutes. Titanium Bars at the moment is your only option to move from 430-435.

From 435-440:
Transmute: Earthsiege Diamond (1 x Dark Jade, 1 x Huge Citrine, 1 x Ethernal Fire) x 5
You now learn Transmute: Earthsiege Diamond, which is yellow till 440.

From 440-445:
Transmute: Skyflare Diamond (1 x Bloodstone, 1 x Chalcedony, 1 x Ethernal Air) x 5
You now learn Transmute: Skyflare Diamond, which is yellow till 445.

From 445-450:
Transmute: Ethermal Might (1 x Ethernal Air, 1 x Ethernal Earth, 1 x Ethernal Fire, 1 x Ethernal Water) x 5
Finally you learn Transmute: Ethermal Might, which is yellow till 450.

At 450 you can learn new flasks such as Flask of the Frost Wyrm (125 spell power for 2 hours) and Flask of Endless Rage (180 attack power for 2 hours). Also I'm not going to list the total materials until the expansion is released and the list is finalized since there is no way to stockpile these materials until then anyway.

And for those wondering - it appears that basically all outland elixirs, potions, and flasks will only level you to 380. If you want to stockpile Outland materials to get to 380 that’s fine, but since Elixir of Spirit and Crazy Alchemist's Potion are both so easy to craft it doesn't make much of a difference if you decide to just start with Northrend patterns.

Special Perks for Alchemists

Alchemists get a few perks in WOTLK, the first being an Alchemist Stone trinket (tank - caster - melee). Alchemists also get to use 2 new types of potions - Crazy Alchemist's Potion which gives random buffs and the big one - Endless Potions (Endless Rejuvenation Potion for example) that are potions with an INFINTE supply usable every 3 minutes...and...wait for it...USABLE IN ARENAS.

Warhammer Online: Confusion with numbers


Seems that there is some confusion about the active subscribers, registered users and copies sold.

Some news pages and blogs report, that Warhammer archived 1.2 million users so far. This is not 100% correct. Actually it's 1.2 million copies delivered to the shops/actually sold. But in reality "only" 800.000 copies have been activated, which is still a pretty good number and even outnumbers World of Warcraft during it's first 2 months. It's highly probable that Warhammer will break the 1 million by the end of this year, which indeed will make it a success, compared to recently MMOs such as Lord of the Rings Online,Vanguard and Age of Conan, which didn't passed the 500.000 mark.

However, 800.000 registered copies, doesn't mean that the game has 800.000 subscriptions. There are many people who were disappointed and didn't subscribe after the first free month included within the retail box. So far the real number of subscribers is unknown.

There are first indications that there is a pretty fairly number of people who stopped playing, which could be observed on some European Servers which are there since the pre-release start where preorder customers could start a few days before the actual release. This servers were pretty full and European servers still don't have a character transfers, so they are quite good for to observer such changes.

Some of the servers, like Carroburg and Erengrad, where full even weeks after the cloning process with queues of 200-400 resulting in waiting times of over 90 minutes. At end of October and beginning of November, the queues suddenly disappeared. No big surprise here, as that's around the time, where the free trial month is expired and many people didn't extended their subscription, which is a good indication that there are indeed many people who stopped playing Warhammer.

Also, on Erengrad it's pretty hard to join a Scenario, as the waiting times there are pretty high which indicates that there are not many level 31-40 characters there who sign up for scenarios. The situation on Carroburg on other side looks much better, the waiting times are around 2-5 minutes depending on the daytime.

Sources:
EA Second Quarter ficial year report 2009

WTBBlue’s WOTLK Guide to Tailoring (350-450)


This is a speed guide and will go over the quickest and cheapest way to level tailoring from 375-450 - with alternative patterns listed whenever it makes sense. Given that none of the professions will be finalized until November 13th this guide will be revised and completed when Wrath of the Lich King is released - however the basic patterns for Tailoring looks pretty complete at the moment so the final build should be similar (if not cheaper to level) to the current beta as of 10/16/2008.

Leveling Guide

Note every pattern listed is purchasable from the trainer or a vendor unless otherwise noted

From 350-375:
Bolt of Frostweave (5x Frostweave Cloth) x 1445
Not at 375 yet? No worries! You can make Bolt of Frostweaves until you are!

From 375-380:
Frostwoven Robe (4x Bolt of Frostweave, 1x Eternium Thread) x5
From 375-425 you can craft basically the entire Frostwoven and Duskweave set - which is worth it if you plan on using it. Otherwise this just goes over the cheapest items in these 2 sets to skill up with.

From 380-390:
Frostwoven Leggings (5x Bolt of Frostweave, 1x Ethernium Thread) x10

From 390-395:
Frostwoven Boots (4x Bolt of Frostweave, 1x Ethernium Thread) x5

From 395-400:
Frostwoven Leggings (5x Bolt of Frostweave, 1x Ethernium Thread) x5

From 400-405:
Bolt of Imbued Frostweave (3x Bolt of Frostweave, 2x Infinite Dust) x5
Craft as may of these as you can until it turns grey at 405, you’ll need it to level from 425-450. If you plan on leveling only to 440 you’ll need 90 of these. If you plan on leveling to 450 you need about 300 more LOL GOOD LUCK.

From 405-415:
Duskweave Wristwraps (8x Bolt of Frostweave, 1x Ethernium Thread) x5

From 415-420:
Duskweave Gloves (9x Bolt of Frostweave, 1x Ethernium Thread) x5

From 420-425:
Duskweave Shoulders (10x Bolt of Frostweave, 1x Ethernium Thread) x5

From 425-430:
Frostweave Bag (6x Bolt of Imbued Frostweave, 2x Ethernium Thread) x5
Black Duskweave Wristwraps (4x Bolt of Imbued Frostweave, 2x Iceweb Spider Silk, 2x Ethernium Thread) x5
Black Duskweave Leggings (5x Bolt of Imbued Frostweave, 2x Iceweb Spider Silk, 2x Ethernium Thread) x5
Depending on if you have any Iceweb Spider Silk, Black Duskweave Wristwraps are the cheapest way to level to 430 - I included the Black Duskweave Leggings as they are a good pair of rare leggings that cost 1 extra Bolt of Imbued Frostweave.

From 430-440:
Frostweave Bag (6x Bolt of Imbued Frostweave, 2x Ethernium Thread) x10
Cheapest thing you can make at this point and at least you can auction them to get some gold back.

From 440-445:
Frostweave Bag (6x Bolt of Imbued Frostweave, 2x Ethernium Thread) x25
Optional Abyssal Bag (4x Ebonweave, 2x Spellweave, 1x Ethernium Thread) x5 - Pattern Obtained through Knights of the Ebon Blade Revered Reputation
Optional Mysterious Bag (4x Spellweave, 2x Moonshroud, 1x Ethernium Thread) x5 - Pattern Obtained through The Wyrmrest Accord Revered Reputation
Optional Glacial Bag (4x Moonshroud, 4x Ebonweave, 1x Ethernium Thread) x5 - Pattern Obtained through The Son of Hodir Exaulted Reputation
Now this gets retardedly hard. There are a handful of patterns that stay yellow to 445 but the cheapest way to go is to just make 25x Frostweave Bags and pray that you get lucky. No seriously. The other option is to craft the 3 rare bags - however Ebonweave, Spellweave, and Moonshroud all have a 4 day cooldown (similar to the cloths in TBC) and the patterns all require reputation to buy.

From 445-450:
Frostweave Bag (6x Bolt of Imbued Frostweave, 2x Ethernium Thread) x25
Optional Ebonweave Gloves (4x Ebonweave, 4x Bolt of Imbued Frostweave, 1x Eternium Thread, 1x Frozen Orb) x5
Optional Moonshroud Gloves (4x Moonshroud, 4x Bolt of Imbued Frostweave, 1x Eternium Thread, 1x Frozen Orb) x5
Optional Spellweave Gloves (4x Spellweave, 4x Bolt of Imbued Frostweave, 1x Eternium Thread, 1x Frozen Orb) x5
Optional Mysterious Bag (4x Spellweave, 2x Moonshroud, 1x Ethernium Thread) x5
Optional Glacial Bag (4x Moonshroud, 4x Ebonweave, 1x Ethernium Thread) x5
You can also make the tailoring epic gloves now as well so might as well craft 1 to help level. Past that the cheapest way is still Frostweave Bag followed by the 2 rare bags. (Abyssal Bags turn green at 445 so is not on this list)

Materials Required

390 Imbued Frostweave
275 Frostweave Bolt
175 Ethernium Thread

Doesn’t sound like much? Lets break it down further:

7225 Frostweave Cloth
780 Infinite Dust
175 Ethernium Thread

Note that this is the fastest way to get to 450 - you can craft the optional items to sell or to use, but you’ll need more types of materials and it’ll cost a lot more and/or take longer

Special Perks for Tailors

Tailors get unique cloak enchants (Healer, Caster, Melee) as well as an easy to craft Spellthread to use on their pants (note that it is not any better then the one they can craft for other players, however the materials are drastically cheaper). Finally tailors get to craft a magic carpet to ride on! Tailors also get a new ability learned from a world drop book - Northern Cloth Scavenging - which increases the cloth drop rates of all Northrend Humanoids they kill!

For those saving TBC materials - you can still make rare/epic TBC tailoring items up to 395 (just about every pattern that crafts a rare/epic item that you learned at 375 will turn green at 390 and gray at 395) however this guide will focus on the cheapest materials to get to 450 - which in all cases points to new Northrend green tailoring items. If you still want to stock up on materials to level with TBC mats your best bet is to craft a ton of Golden Spellthread/Runic Spellthread as they are currently the cheapest high level items as well as still being somewhat useful in WOTLK.

Source: http://www.wtbblue.com/

Monday, November 24, 2008

First player to get "Glory of the Hero"


Yesterday, Negiva from Forlon Legacy was the first player to achieve this achievement. That's 39 achievements spread around all heroic instances currently available in World of Warcraft: Wrath of the Lich King rewarding a Red Proto-Drake, which is a 280% speed mount.

A short interview can be found at MMO-Champion

Warhammer Online: What is it?


Warhammer Online is a next-generation MMORPG and successor of Dark Ages of Camelot with the main Focus on RvR (Realm vs Realm) fight. In Realm vs Realm there are usually 2 (or more) factions consisting of 2 or more races who fight side on side against the other factions. Mythic, the developer behind Dark Ages of Camelot and Warhammer, promotes Warhammer as a game, where "WAR" (also used as abbreviation for Warhammer: Age of Reckoning) is everywhere.

What does this mean?

It means that from the beginning at level 1, you will be involved in the war between the Armies of Order and Destruction. What ever you do - be it Quests, PvE or PvP - it will bring the feeling of war. You can master your character and hit max level by doing only PvP or only doing PvE or a mix of both. For the best and fastest experience it's recommended to do a mix of both. This way you get involved with the background story of Warhammer and can participate in the PvP and learn to master your character when you hit level 40.

What makes Warhammer different from other MMOs?

  • Focus on PvP/RvR
    Unlike PvE games like World of Warcraft, Warhammer online focuses on PvP/RvR. Most of the time in Warhammer you'll be fighting other players, may it be in instanced Scenarios or in the open world RvR Zones
  • Open World PvP/RvR
    In the Open World players have to capture Battleground Objectives and Keeps in order to take control over a certain zone. If a factions controls enough zones, they can start a raid on the enemies capital city, burn it down and plunder it
  • Public Quests
    Mythic introduced something called "Public Quests" in Warhammer. Public Quests are special places within a Zone, where scripted event is running and everyone who passes by can participate without the need to join a group or get a quest. Everyone within the range of the Public Quest can participate by contributing to the Public Quest objectives. There are usually 2-4 steps to be done. Last step usually have a more or less tough boss to beat. The loot is distributed at the end of the Public Quest, depending on your participation you get a bigger bonus on the rolls and everyone who have enough contribution rolls a random number between 1 and 1000 + Contribution Bonus. A few minutes later, the Quest restarts and can be repeated as often as you like

Warhammer Online was released on 18-08-2008.

Warhammer Online US Homepage
Warhammer Online Europe Homepage

4 years of World of Warcraft


Starting on Monday, there is a new event/achievement to earn when you log in to your World of Warcraft account.

All players who login within the next days, receive a "WoW's 4th Anniversary" achievement and a in-game mail containing a "Blizzard Baby Bear" vanity pet.

wow4thanniversary_small

Happy Birthday World of Warcraft!